|
Rittners School Of Floral Design
In Boston Presents.....
 Dual Purpose Design Dual Purpose Design
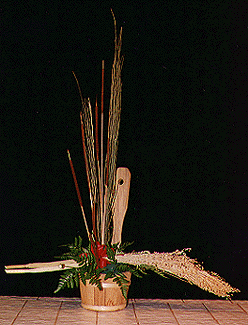
This is an example of a floral design that can be used quite effectively in different contexts. At first glance, it appears to be a vase arrangement......a very pretty one sided arrangement using live and dried materials.....and that's that.
Yet on the other hand, look more carefully!!
The base upon which the design is stylized looks almost like a giant ladle or spoon, with a giant hole on the top. It could be placed on a door or on a wall. So we also have a design here that is a wall hanging piece. Depending upon your architecture it could be placed on a front door (weather permitting) on interior doors, or even hung like a picture on the wall. Perhaps even one or more could be placed over a mantle.
So what we are dealing with here folks, is a very versatile design that could be displayed in many different ways around the home. Keep your eye out for these kinds of bases.....They can really come in handy!!
What You Will Need
Container
Liner
Dried Materials
Cattails
Pom Pons-Different Colors
Miniature Carnations
Baker Fern
Foam
Scotch Broom
Be sure that your base can hold foam without leaking water. If that is not the case, you could have a rather wet and messy situation.
There are several options. One is to simply use silk materials (and that eliminates the wet foam!). The second is to take a small plastic dish about the same size as the base and place it into the container as a "liner." Then place foam into the plastic liner and you are all ready to make your design!
Start with your dried materials. We are deliberately being vague about the materials that we are using, for we realize that what you find and use may be different than what you see in this photograph. Wheat, barley, bunny tails or any bundle of dried materials can be used to create the "plume" like effect. This bundle is placed across the top of the foam. A piece of #20 wire is taped and wrapped around the bundle. It is picked into the top of the foam. A ribbon bow is placed over the wire to hide the mechanics.
Use scotch broom to create the height in your design. It can be used fresh or dried. A few cattails are placed slightly to the top left side of the design to both fill in and create additional texture. Place some baker fern as shown in the photograph to cover the mechanics.
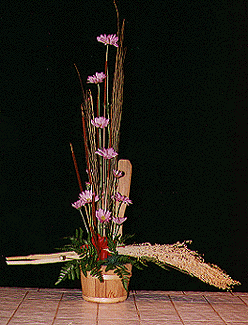
Let's start adding flowers to the design. The scotch broom and the dried materials defined the area within which we are designing. Now it is simply a matter of fill in!
Start up high and gradually work towards the base as shown in the photograph. The advantage of daisy poms is that they last very well and you can get multiple blossoms from each stem.
Continue to add daisy poms down towards the base of the design. Notice how we add more flowers gradually widening out the design at the base. Add a few white daisy poms on the left side, for added interest.
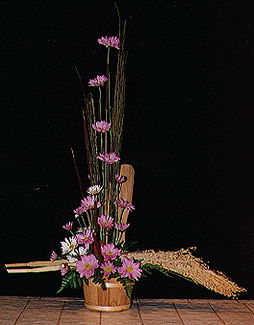
Place some bronze color daisy poms towards the right side of the base. The addition of the white and bronze daisy poms provide more visual weight that is needed at the bottom of the arrangement. It "feels" more stable, more secure. (Compare this photo to the last one and you'll get a better sense of that design issue.) A small line of orange miniature carnations extends out towards the right of the design, and completes the unit.
We hope that you really enjoyed this brief floral design lesson. At
Rittners School of Floral Design
in Boston we provide floral design instruction that includes a wide range of different styles and techniques. Please come and take one of our hands-on workshop programs!!
Rittners Floral School Gallery returns you to our Floral Education Center.
Your Webmaster is Dr. Steve Rittner, who may be reached at Stevrt@tiac.net.
All photographs and text on this page are Copyright - Rittners School,
and may not be reproduced, or used for any commercial purposes.
|